Shedding light on machine tool quality
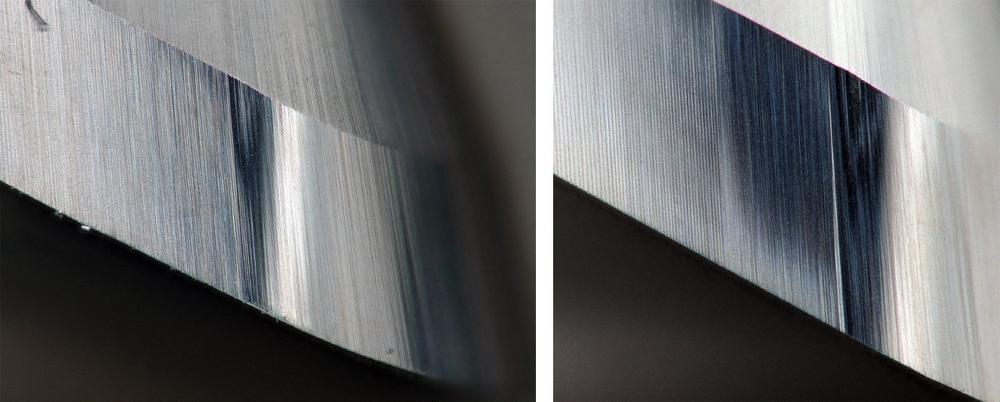
According to Jörg Federer, NUMROTO Application Manager at NUM’s Swiss HQ, “NUMROTO is our flagship product. Ever since the software’s initial release back in 1987, development has centred around the core principle that to achieve a comprehensive tool grinding solution, it is important to analyse and optimise the entire process chain. The new digital microscope extends our surface analysis capabilities down to sub-micron levels, providing valuable feedback on process technology and tool production quality”.
As a leader in high-end CNC technology, NUM operates extensive research and development facilities. These cover the hardware and software components of CNC systems and drives, as well as the design of a wide range of motor types. The NUMROTO Technology Centre forms an extension to these facilities, providing both in-house product development expertise and customer-accessible applications support services.
Thanks to the high performance CNC platforms, such as NUM’s Flexium+ system, many of today’s machine tools are capable of producing superb results. NUMROTO software can calculate paths so accurately that theoretically micrometre-precise tools should always result. However, a number of factors can prevent this precision being reflected in the ground tool.
The primary causes of grinding machine errors, which are usually correctable, are mechanical limits and wear. The effects of dynamic limits generally manifest themselves at transitions between geometry elements, such as between the ball nose radius and the cylinder of a radius cutter. This critical area is often traversed in less than 100 milliseconds – during which time the swivel axis stops and the rotary axis accelerates rapidly – and means that sub-optimal drive settings can cause grinding-in. By analysing any visible marks on the tool’s surface using digital microscopy, it is possible to determine the necessary corrections to the drive settings.
Another common source of tool grinding errors is when the grinding wheel does not run completely true or is not cleanly dressed. This can create regular grooves on the tool’s relief angle, especially at the transition between the relief angles. Invisible to the naked eye, even with a magnifying glass, the grooves are caused by the grinding wheel glancing against the workpiece during every revolution. The high resolving power of the digital microscope facilitates a very quick check on the condition and dynamic performance of grinding wheels.
The expertise and resources of the NUMROTO Technology Centre are available to customers as well as to NUM’s research and development teams. The centre undertakes feasibility studies on special tools, and provides NUMROTO customer training.
Outstanding solutions in machine automation share a common theme: they are always the product of outstanding performance, exceptional technologies and a high degree of creativity.
It’s these core attributes that have earned NUM its exceptional reputation within the machine tool industry. We develop the most sophisticated, tailor-made CNC automation solutions, which guarantee maximum added value for both the machine manufacturer and the user. Our strength as proven CNC specialists begins where it ends for many of our competitors: with a pronounced application competence in the field of CNC-controlled production machines. Our interdisciplinary expertise, which has grown over decades, is reflected in all our solutions – this directly benefits you as the customer, user and partner. We have developed countless customer- and application specific solutions for diverse industries – practical solutions for professional needs. With this in mind, our engineers create groundbreaking complete solutions for demanding applications.
NUM AG
Battenhusstrasse 16
CH9053 Teufen
Telefon: +41 71 335 04 11
Telefax: +41 71 333 35 87
https://www.num.com/
Telefon: +41 71 335 04 11
E-Mail: sales.ch@num.com
Marketing Communication Manager
Telefon: +41713350411
E-Mail: jacqueline.boeni@num.com
![]()


